dbt Snowflake Tutorial for Beginners: Setup, Connection & Best Practices
Getting started with dbt Core and Snowflake
Analytics tools and processes are changing quickly. Tools like dbt and Snowflake have emerged as game-changers and core components to many data stacks. If you’re already on Snowflake, why should you consider integrating dbt with Snowflake? And if you’re considering a complete overhaul of your stack from a different data warehouse, what does the dbt+Snowflake partnership offer that might be unique?
In this guide, we'll delve deep into the synergy between dbt and Snowflake, starting with the compelling reasons to marry these technologies. For those eager to get hands-on, we've prepared a step-by-step dbt Snowflake tutorial that leverages Snowflake’s sample database and a dbt project template from PopSQL—perfect for beginners and seasoned pros alike. We'll also review deployment options for your dbt project, discussing various technologies to help you orchestrate and schedule your tasks seamlessly. And to ensure you're getting the most out of your dbt-Snowflake integration, we'll round off with a collection of essential tips and best practices tailored specifically for this duo.
Why should you use dbt in Snowflake?
Combining dbt and Snowflake creates a transformative environment for data teams. It brings forward a fusion of flexibility, efficiency, and reliability. Here are some advantages that come with using dbt in a Snowflake environment:
Scalable Cloud-Native Performance
Both dbt and Snowflake are cloud-native tools. Snowflake's architecture, with its unique separation of compute and storage layers, means that users can easily scale up or down as needed without any performance degradation. When paired with dbt, which streamlines SQL workflow, it's a powerhouse combination for handling massive datasets and complex transformations efficiently.
Collaborative Environment for Data Teams
dbt promotes version control, code reviews, and documentation. This encourages a collaborative environment where data scientists, analysts, engineers, and other stakeholders can actively participate, review, and contribute, ensuring high-quality and maintainable code.
Simplified ELT Processes
With Snowflake's robust capabilities and dbt's transformation functions, ELT (Extract, Load, Transform) becomes far more streamlined. This process allows raw data to be loaded into Snowflake and then transformed in-place using dbt, making transformations more efficient and straightforward.
Enhanced Data Testing and Validation
dbt offers built-in functionality for data testing. This ensures that the transformations are not only accurate but also reliable. With Snowflake's immediate feedback on query performance and dbt's testing functions, teams can quickly identify and address data issues, ensuring the highest data quality.
Version Control and Modularity
One of dbt's foundational principles is the use of version control. This ensures that every change is tracked, making it easier to collaborate, revert to previous versions, or branch out to test new ideas. Furthermore, dbt promotes a modular approach to SQL modeling, allowing code reuse and making the overall process more maintainable.
Data Governance and Security
Snowflake brings robust security features, including automatic encryption, role-based access controls, and multi-factor authentication. Pairing this with dbt's clear lineage and documentation means that organizations can ensure data is not only secure but also used correctly and responsibly.
Seamless Integration with Modern Tools
Both dbt and Snowflake offer vast ecosystems, easily integrating with modern BI tools, data orchestration platforms, and other data-centric solutions. This means data teams can build a cohesive, end-to-end data platform with relative ease.
Documentation and Lineage
dbt auto-generates documentation for your analytics code and dependencies. With the combination of dbt and Snowflake, your data lineage becomes clearer, making it easier for stakeholders to understand data sources, transformations, and the overall journey of your data.
The combination of dbt and Snowflake offers a powerful environment for businesses and data teams. They can harness the full potential of their data, maintain agility, ensure quality, and foster a collaborative, transparent, and efficient data culture.
dbt Snowflake Tutorial
Next we’ll walk through an example showing how to create a new dbt project for Snowflake from scratch. For simplicity, we’re going to use PopSQL as the dbt IDE. You could also develop your project locally, but that requires installing dbt for Snowflake and git on your computer.
For this tutorial we'll use Snowflake’s SNOWFLAKE_SAMPLE_DATA database that is automatically included in your Snowflake warehouse, specifically the TPCH_SF1 schema. More info here.
Plan out the first dbt mart you want to build
A data mart is the end result of multiple levels of dbt modeling. It’s the data model that is used to power your queries for analysis and data visualization. Before you embark on cleaning and modeling your raw data sources, it’s a good idea to lay out the destination.
Our plan for this tutorial is to create an
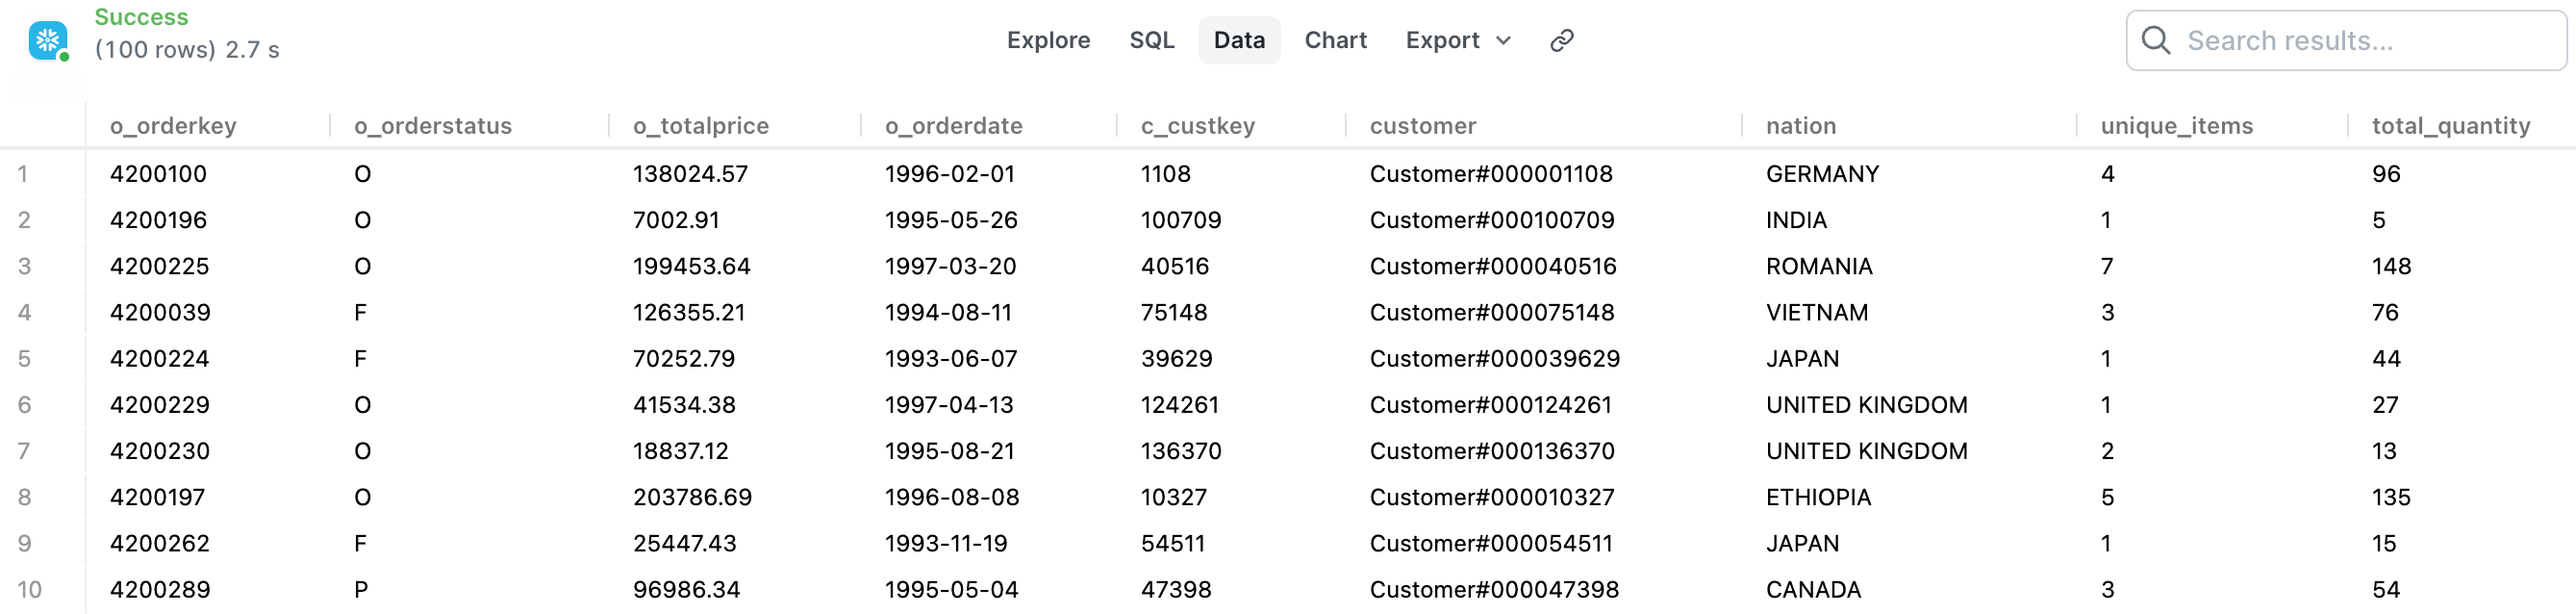
ordersdata mart that gives us a clean list of all orders from both web and in-store sales, plus enriches that list with customer information and details from order line items. The fields we need in the data mart are below.Order fields Order item fields Customer fields Order Key Order Unique Items Customer Key Order Status Order Total Quantity Customer Name Order Total Customer Nation Order Date Order Month Next, we'll work from raw data sources to go through the steps required to make sure we have all the right raw data to power these fields in the data mart. The easiest way to do this is to write a SQL query that outputs what you want in your final dbt data mart. Here’s the query that does that for our example:
select
    o_orderkey,
    o_orderstatus,
    o_totalprice,
    o_orderdate,
    c_custkey,
    c_name as customer,
    n_name as nation,
    max(l_linenumber) as unique_items,
    sum(l_quantity) as total_quantity

from snowflake_sample_data.tpch_sf1.orders o

inner join snowflake_sample_data.tpch_sf1.lineitem l
    on l.l_orderkey = o.o_orderkey

inner join snowflake_sample_data.tpch_sf1.customer c
    on c.c_custkey = o.o_custkey

inner join snowflake_sample_data.tpch_sf1.nation n
    on n.n_nationkey = c.c_nationkey

group by 1,2,3,4,5,6,7
Example output:
Define your Snowflake source tables in your dbt project
The first step is to tell dbt which tables it should be looking at. We'll also add some basic tests to these sources to make sure there are no obvious issues with the source data before we feed it into our models. You can read more in PopSQL's tutorial page about dbt sources.
Based on the requirements for our data mart, we know all the data we need can be found in these four tables:
customer,order,lineitem,nation.Sources are defined in source config
.ymlfiles (see official dbt docs for more info). These files need to be in your/models/folder, or a subdirectory like/models/staging/or/models/sample/staging/. We're putting our sources file directly into/models/staging/since this sample project only has one main data source, so there’s no reason for nested folders.The file name should follow a consistent format, so as you add more sources to your project, it's easy to keep them straight. The most common naming structure is a single underscore, followed by the source group, then
__sources.yml. So for oursampleexample, we'll use a file name of_sample__sources.yml.The simplest version of our sources file needs to tell dbt which schema and tables to reference. The source name is the database schema, and the source tables are listed one layer below, like this:
version: 2 sources: - name: sample database: snowflake_sample_data schema: tpch_sf1 tables: - name: customer - name: order - name: lineitem - name: nationnameis what we’ll use to refer to this group of sources everywhere else in dbt models.databasetells dbt which Snowflake database to use. We need this since our dbt target database is different from our source database. If you’re doing everything in a singe database, this line can be omitted.schematells dbt which schema to use. If yournamematches yourschemayou can omit theschemaconfig line and dbt will use thenameas the schema.
It's recommended to add some basic data quality tests to source config files as well, specifically checking for unique and non-null values in important columns for each table. After adding those checks for our sources, the file looks like this:
version: 2

sources:
  - name: sample
    database: snowflake_sample_data
    schema: tpch_sf1

tables:

  - name: customer

    columns:
      - name: c_custkey
        tests:
          - unique
          - not_null
      - name: c_name
        tests:
          - not_null

  - name: orders

    columns:
      - name: o_orderkey
        tests:
          - unique
          - not_null
      - name: o_custkey
        tests:
          - not_null
      - name: o_orderdate
        tests:
          - not_null
      - name: o_totalprice
        tests:
          - not_null

  - name: lineitem

    columns:
      - name: l_orderkey
        tests:
          - not_null
      - name: l_quantity
        tests:
          - not_null
      - name: l_linenumber
        tests:
          - not_null

  - name: nation

    columns:
      - name: n_nationkey
        tests:
          - unique
          - not_null
      - name: n_name
        tests:
          - not_null
The
version: 2at the top ensures dbt reads your files correctly, more info here.When you use dbt commands that trigger a test, like
dbt buildordbt test, you'll see errors if any of your data checks from the sources file fail. For example, this is the output after runningdbt testagainst ourlineitemsource: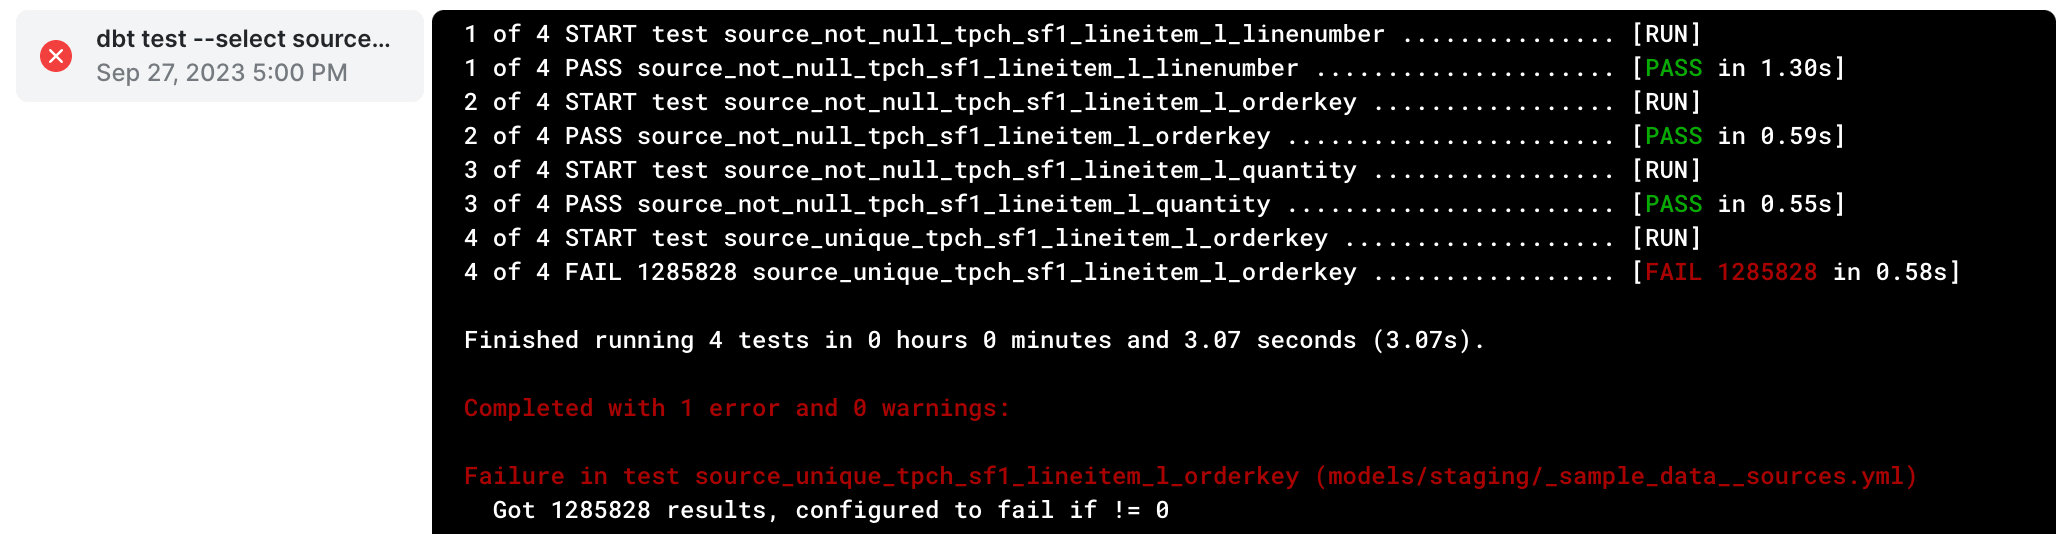
- In this example, the test failed because it was expecting
l_orderkeyto be unique and it found 1MM+ duplicates. That was an incorrectly configured test, becausel_orderkeyis only unique in theorderstable, not thelineitemtable. After removing that test from our sources file and retryingdbt testwe’ll see a successful output: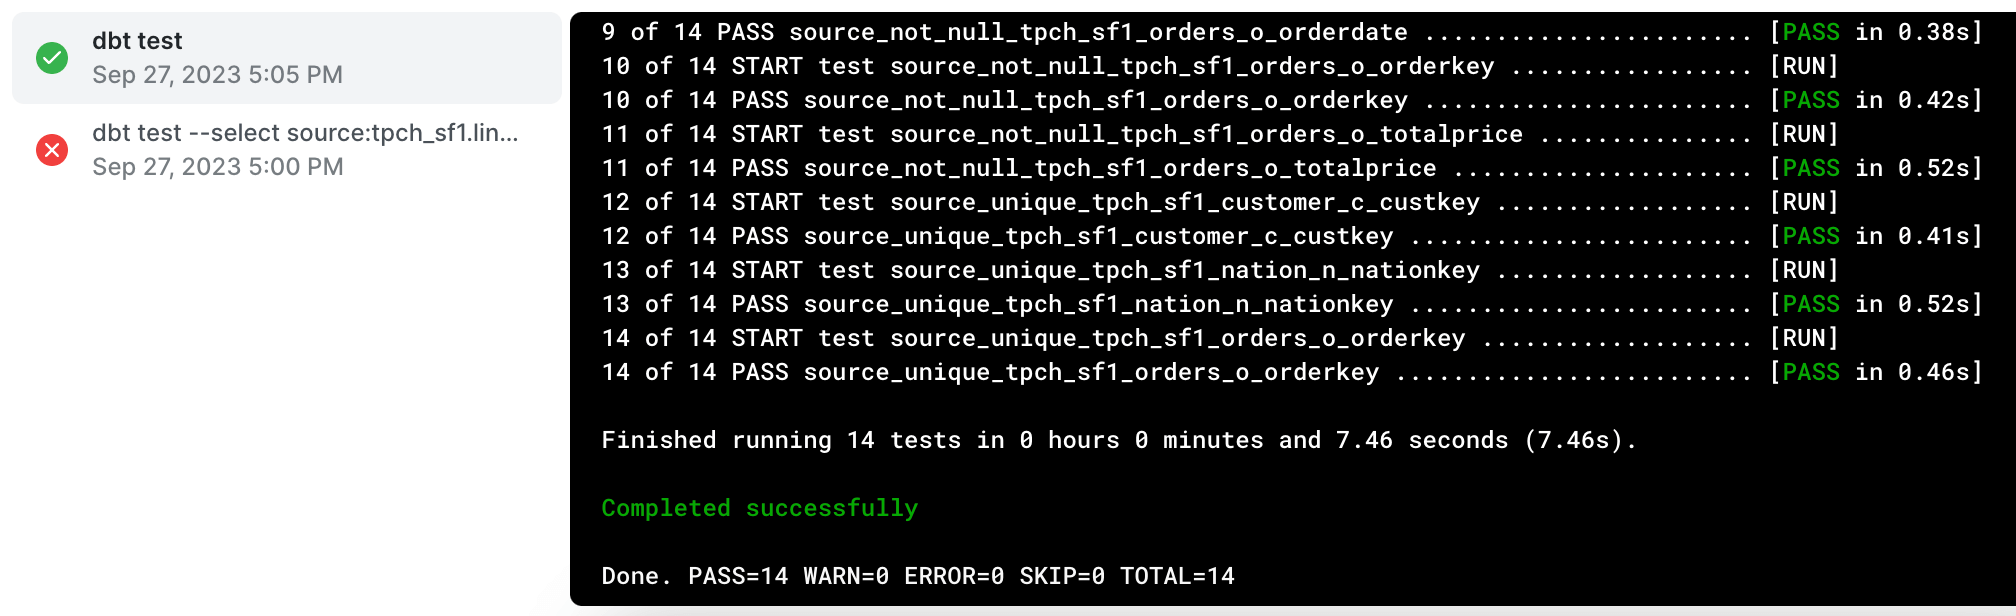
Add a staging model for each source
Now that your dbt project knows where to find raw source data that you need, we’ll create our first layer of models: staging models. There will be one (and only one) staging model for each source you defined.
In dbt, staging models are the foundational layer of your transformation process. They take raw data from your sources and turn it into a more usable format, but without adding business logic just yet. Staging models typically:
- Rename or alias fields to be more understandable.
- Remove fields that aren't needed in data marts.
- Convert data types to more appropriate formats.
- Filter out any irrelevant records like deleted or corrupted rows.
In our example, we need four staging models:
customer,orders,lineitem,nation. We'll walk through creating theordersstaging model below, but you can see all the staging models in our sample dbt project on Github.The
orderstable in our sample data has these columns: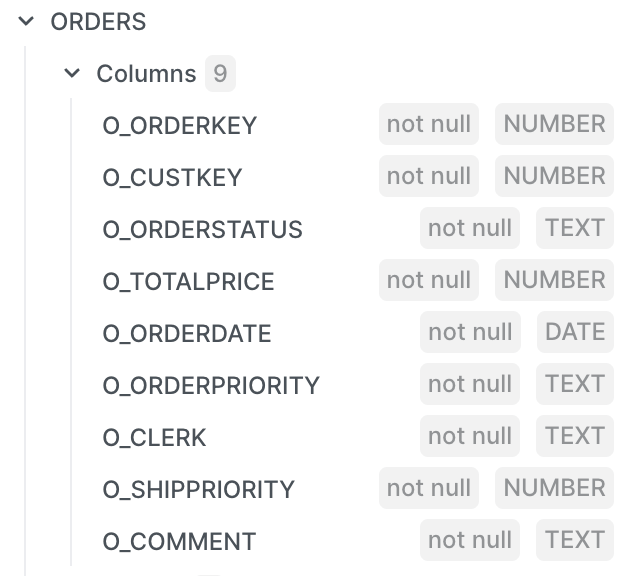
Based on our requirements for the data mart we are building, we only need these columns:
o_orderkey,o_orderstatus,o_totalprice, ando_orderdate. We also need to add anorder_monthfield by truncating the order date.The query to build the
ordersstaging model would look like this. We've only selected the fields we need and addedorder_month. It’s recommended to only select fields you need to keep your dbt project simple. If you select every column in every staging model, things get messy fast.select --primary key o_orderkey as order_key, --order details o_totalprice as order_total, o_orderdate as order_date, --truncate date to month for monthly reports date_trunc('month', o_orderdate) as order_month, --make statuses more readable case when o_orderstatus = 'O' then 'Open' when o_orderstatus = 'F' then 'Filled' when o_orderstatus = 'P' then 'Processing' end as order_status from {{ source('sample', 'orders') }}The model selects from a reference to our
orderssource. Never reference actual tables in dbt models, always use references. In staging models those references will always be to one specific source table, like{{ source('sample', 'orders') }}.The name of your staging models should also follow a consistent structure. A typical structure is to prefix staging models with
stg_then the source category, then two underscores, then the source table name. In the case of our orders table the model is namedstg_sample__orders.We need to add a staging model for each additional source:
lineitem,customer, andnation. You can see them all in the sample project here. Once complete, we're almost ready to create theordersdata mart. From fields we could pull directly from sources, we have these columns ready across four sources:Order fields Order item fields Customer fields ✅ Order Key ❌ Order Unique Items ✅ Customer Key ✅ Order Status ❌ Order Total Quantity ✅ Customer Name ✅ Order Total ✅ Customer Nation ✅ Order Date ✅ Order Month Since we don't have Order Unique Items or Order Total Quantity, we’ll need to sum up those values by joining together
ordersandlineitemvalues. Calculations that require multiple tables should always be done in an intermediate dbt model.
Create intermediate dbt models for aggregations
Next, we'll create an intermediate model that will join staging models together and allow us to create aggregations. In order to get accurate values for
order_unique_itemsandorder_total_quantity, we need these fields:order_keyandline_quantity. We’ll also be relying on the source test that checksline_keyfor uniqueness, but that field is not needed in the model itself.In intermediate models, you’ll use model references rather than source references. You’re building on the cleanup you did in the staging models, so you can trust that the source data passed tests, and has been renamed and recast in the staging model. Model references look like this:
{{ ref('stg_sample__orders') }}. You simple use the name of the model file inside arefJinja function.Intermediate models should follow a consistent naming structure. The common structure is to prefix with
int_and follow the same pattern as staging models after that. The main difference is that you’ll need to get a bit creative to name intermediate models while still keeping the name clear. We called the intermediate model for our martint_sample__orders_joined_lines.sql, and the query looks like this:select o.order_key, count(1) as order_unique_items, sum(line_quantity) as order_total_quantity from {{ ref('stg_sample__orders') }} as o inner join {{ ref('stg_sample__lineitem') }} as l on l.order_key = o.order_key group by o.order_keyWe can use a simple
count(1)forunique_itemsbecause we already have dbt tests that check for uniqueness and non-null values inorder_keyandline_key.Now we have all the fields we need to build our
ordersmart!Order fields Order item fields Customer fields ✅ Order Key ✅ Order Unique Items ✅ Customer Key ✅ Order Status ✅ Order Total Quantity ✅ Customer Name ✅ Order Total ✅ Customer Nation ✅ Order Date ✅ Order Month
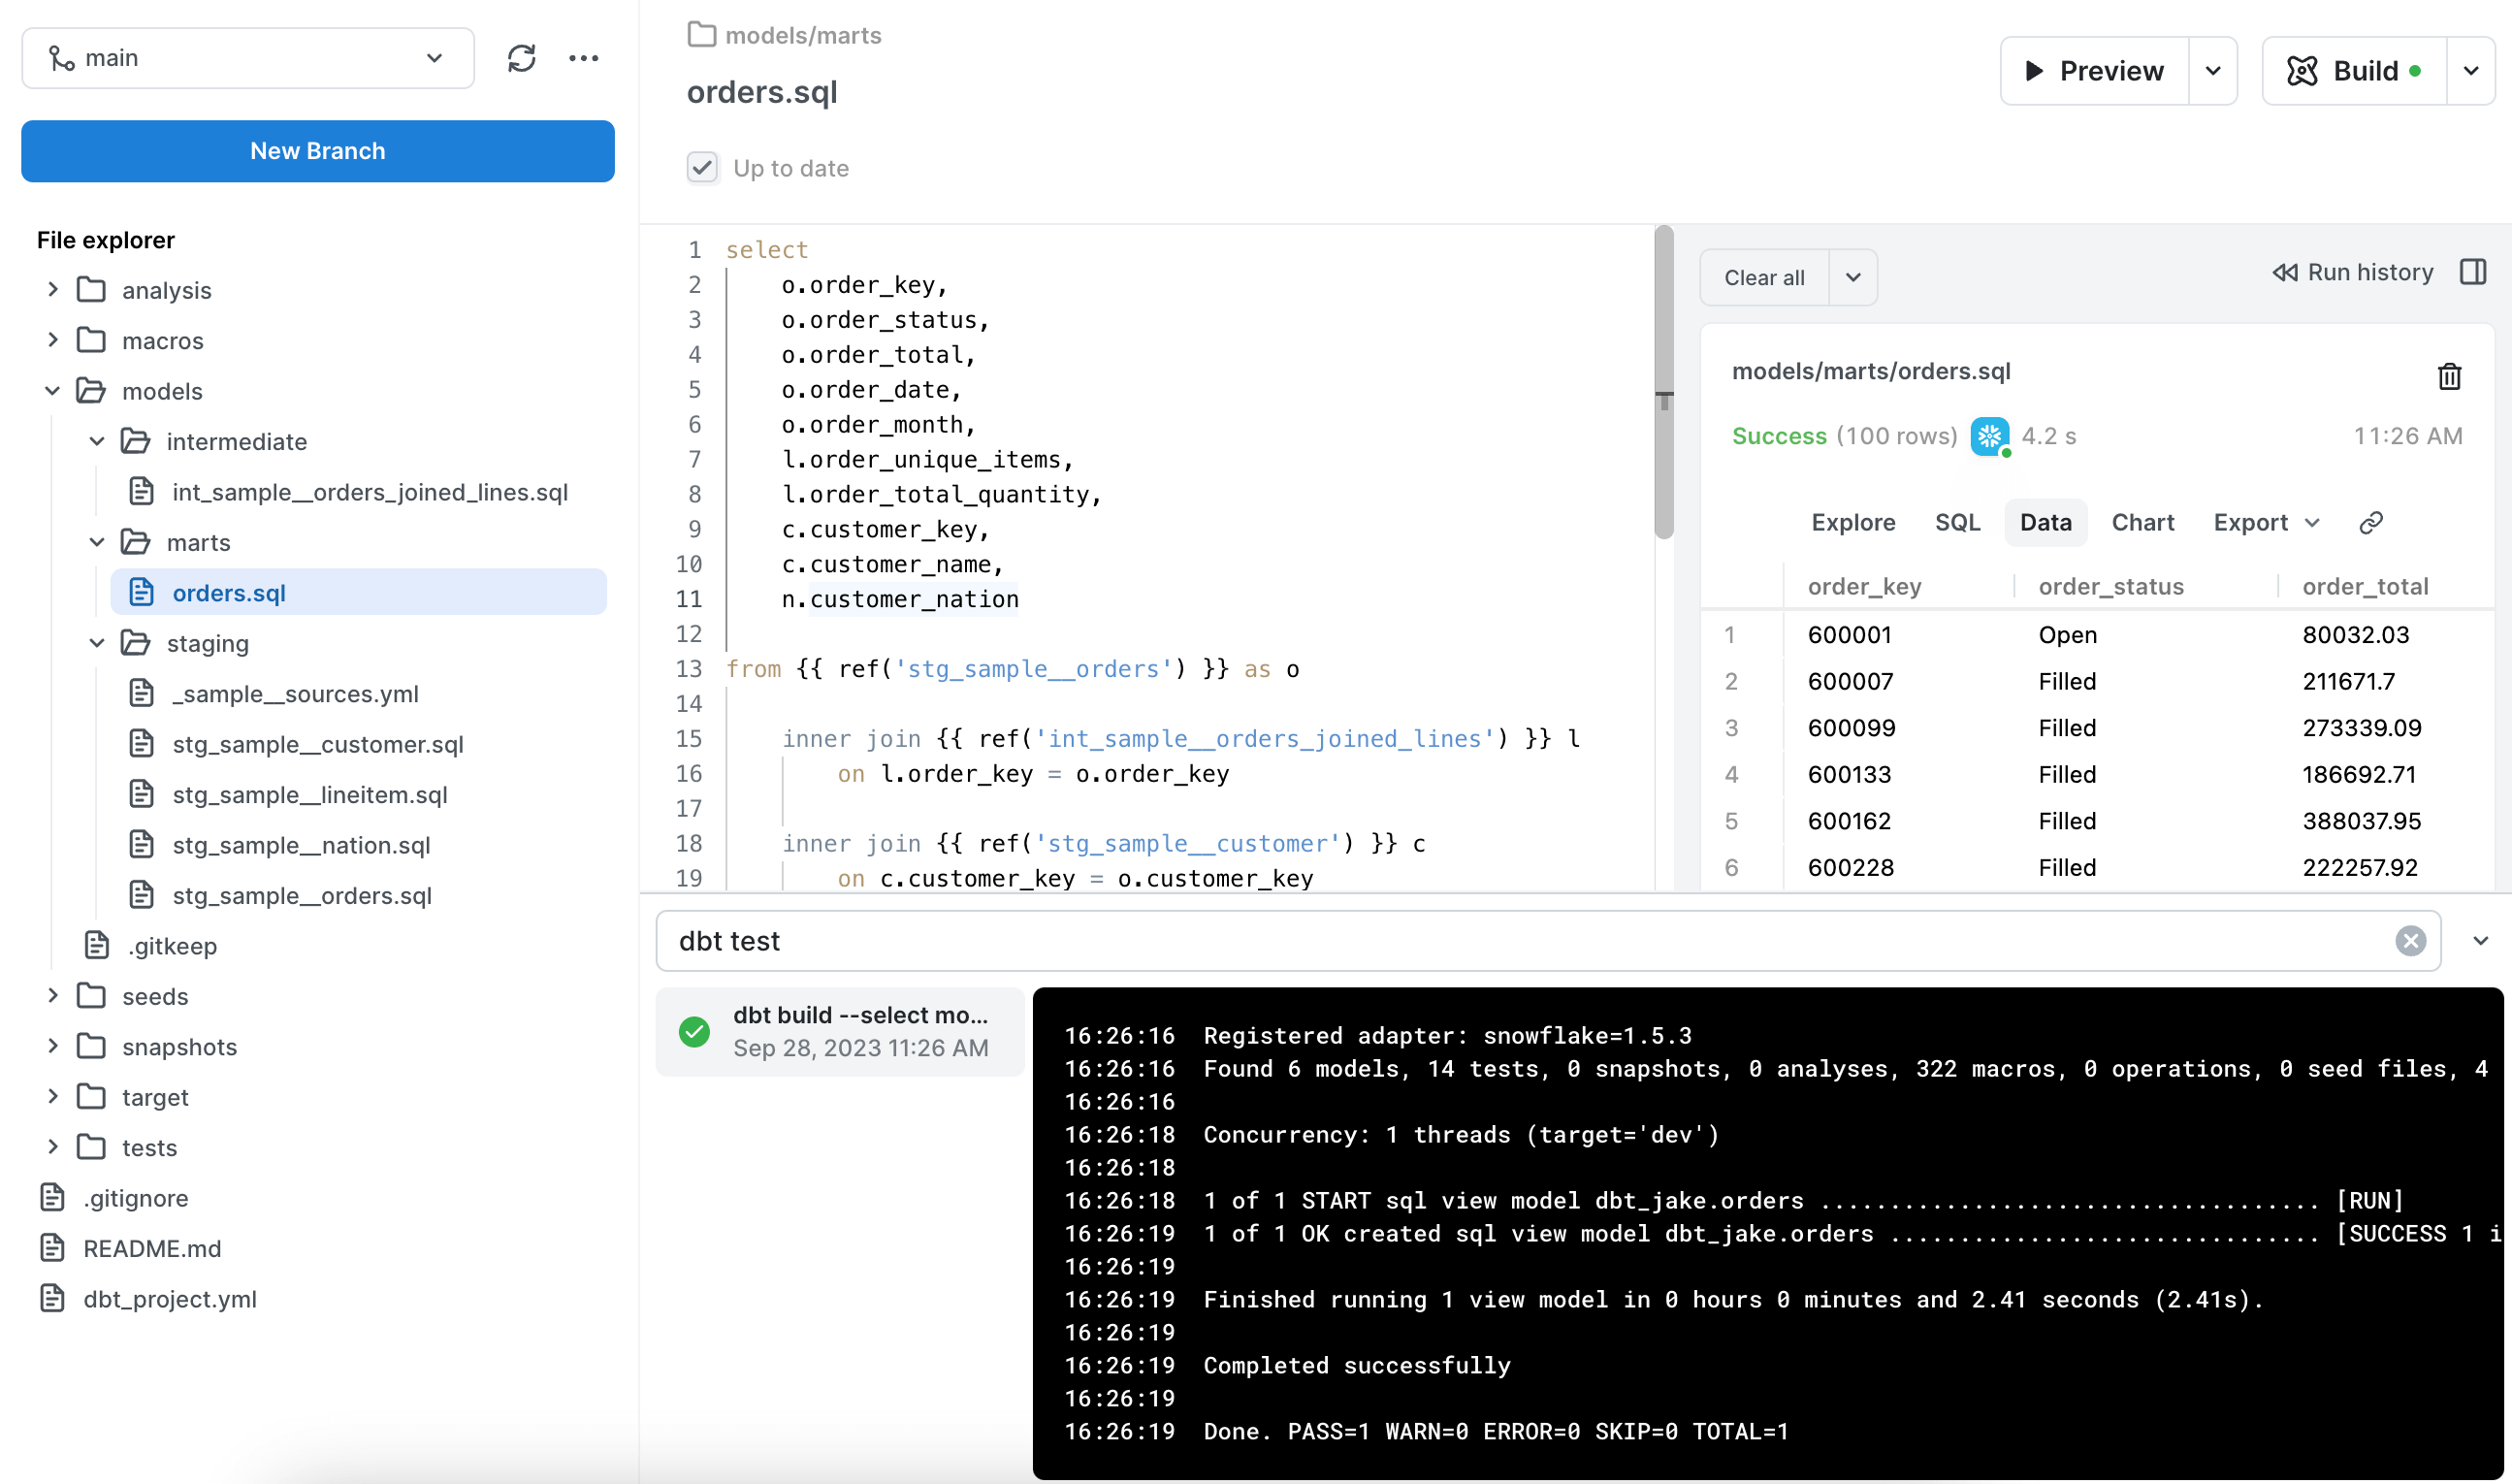
Create your data mart model
Now we’ll bring everything together to create the
ordersdata mart. Naming convention for marts is simple, make it as obvious and easy to understand as possible. We're just going to call our data martorders.There should be no renaming or manipulation of data in your data mart dbt models. You'll also never reference data sources in these models. All you need to do is join together staging and intermediate models. The
ordersmart for this demo would look like this:select o.order_key, o.order_status, o.order_total, o.order_date, o.order_month, l.order_unique_items, l.order_total_quantity, c.customer_key, c.customer_name, n.customer_nation from {{ ref('stg_sample__orders') }} as o inner join {{ ref('int_sample__orders_joined_lines') }} l on l.order_key = o.order_key inner join {{ ref('stg_sample__customer') }} c on c.customer_key = o.customer_key inner join {{ ref('stg_sample__nation') }} as n on n.nation_key = c.nation_keyIt captures exactly the fields we need without any extra fields or complexity. If we run into any problems with a field, we can easily track down the problem by looking at the staging or intermediate model it came from.
Build your dbt mart and upstream models
- Now that everything is defined, we need to trigger some dbt commands. In order to run our tests and create database views for all our models, we’ll use
dbt build. If all is well you'll see a message ofCompleted successfully.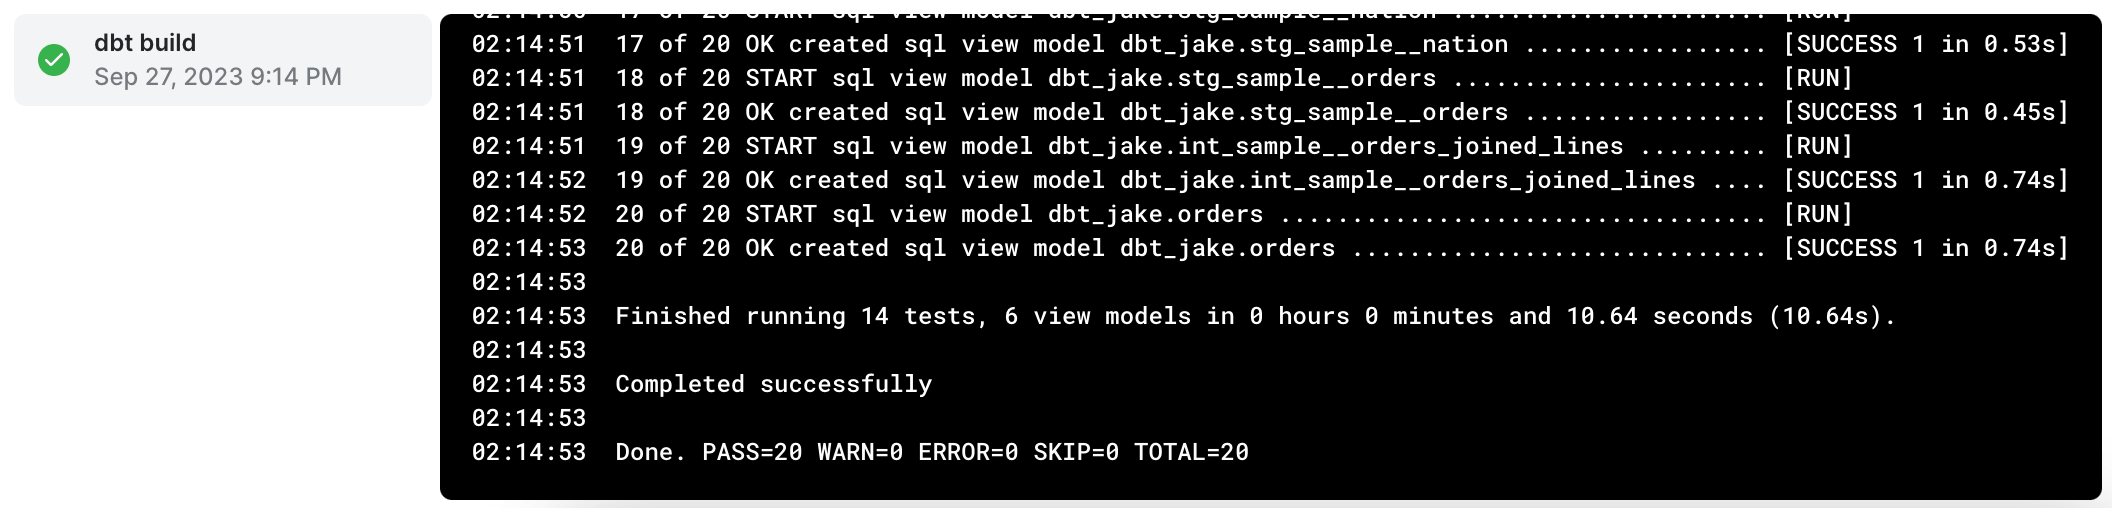
- We'll now see views for our
ordersmart and all the upstream models (staging and intermediate) as well. They’ll be in your target schema, in my case it’s calleddbt_jake.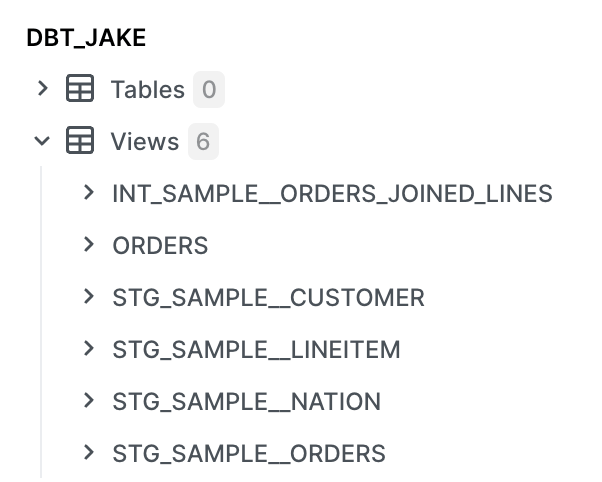
And here are the columns created by dbt in my
ordersmart:
There are more complex things you can set up, like materializing the
ordersmart into a table, but we’ll save those more advanced concepts for another time. Ourordersmart is now ready to be used in queries to share with business users. Since all important fields are in a single table, people who are new to SQL will likely be able to self-serve by writing simpleselectstatements as well. Here’s an example PopSQL query and simple chart with variables added for some of the fields we defined in theordersmart: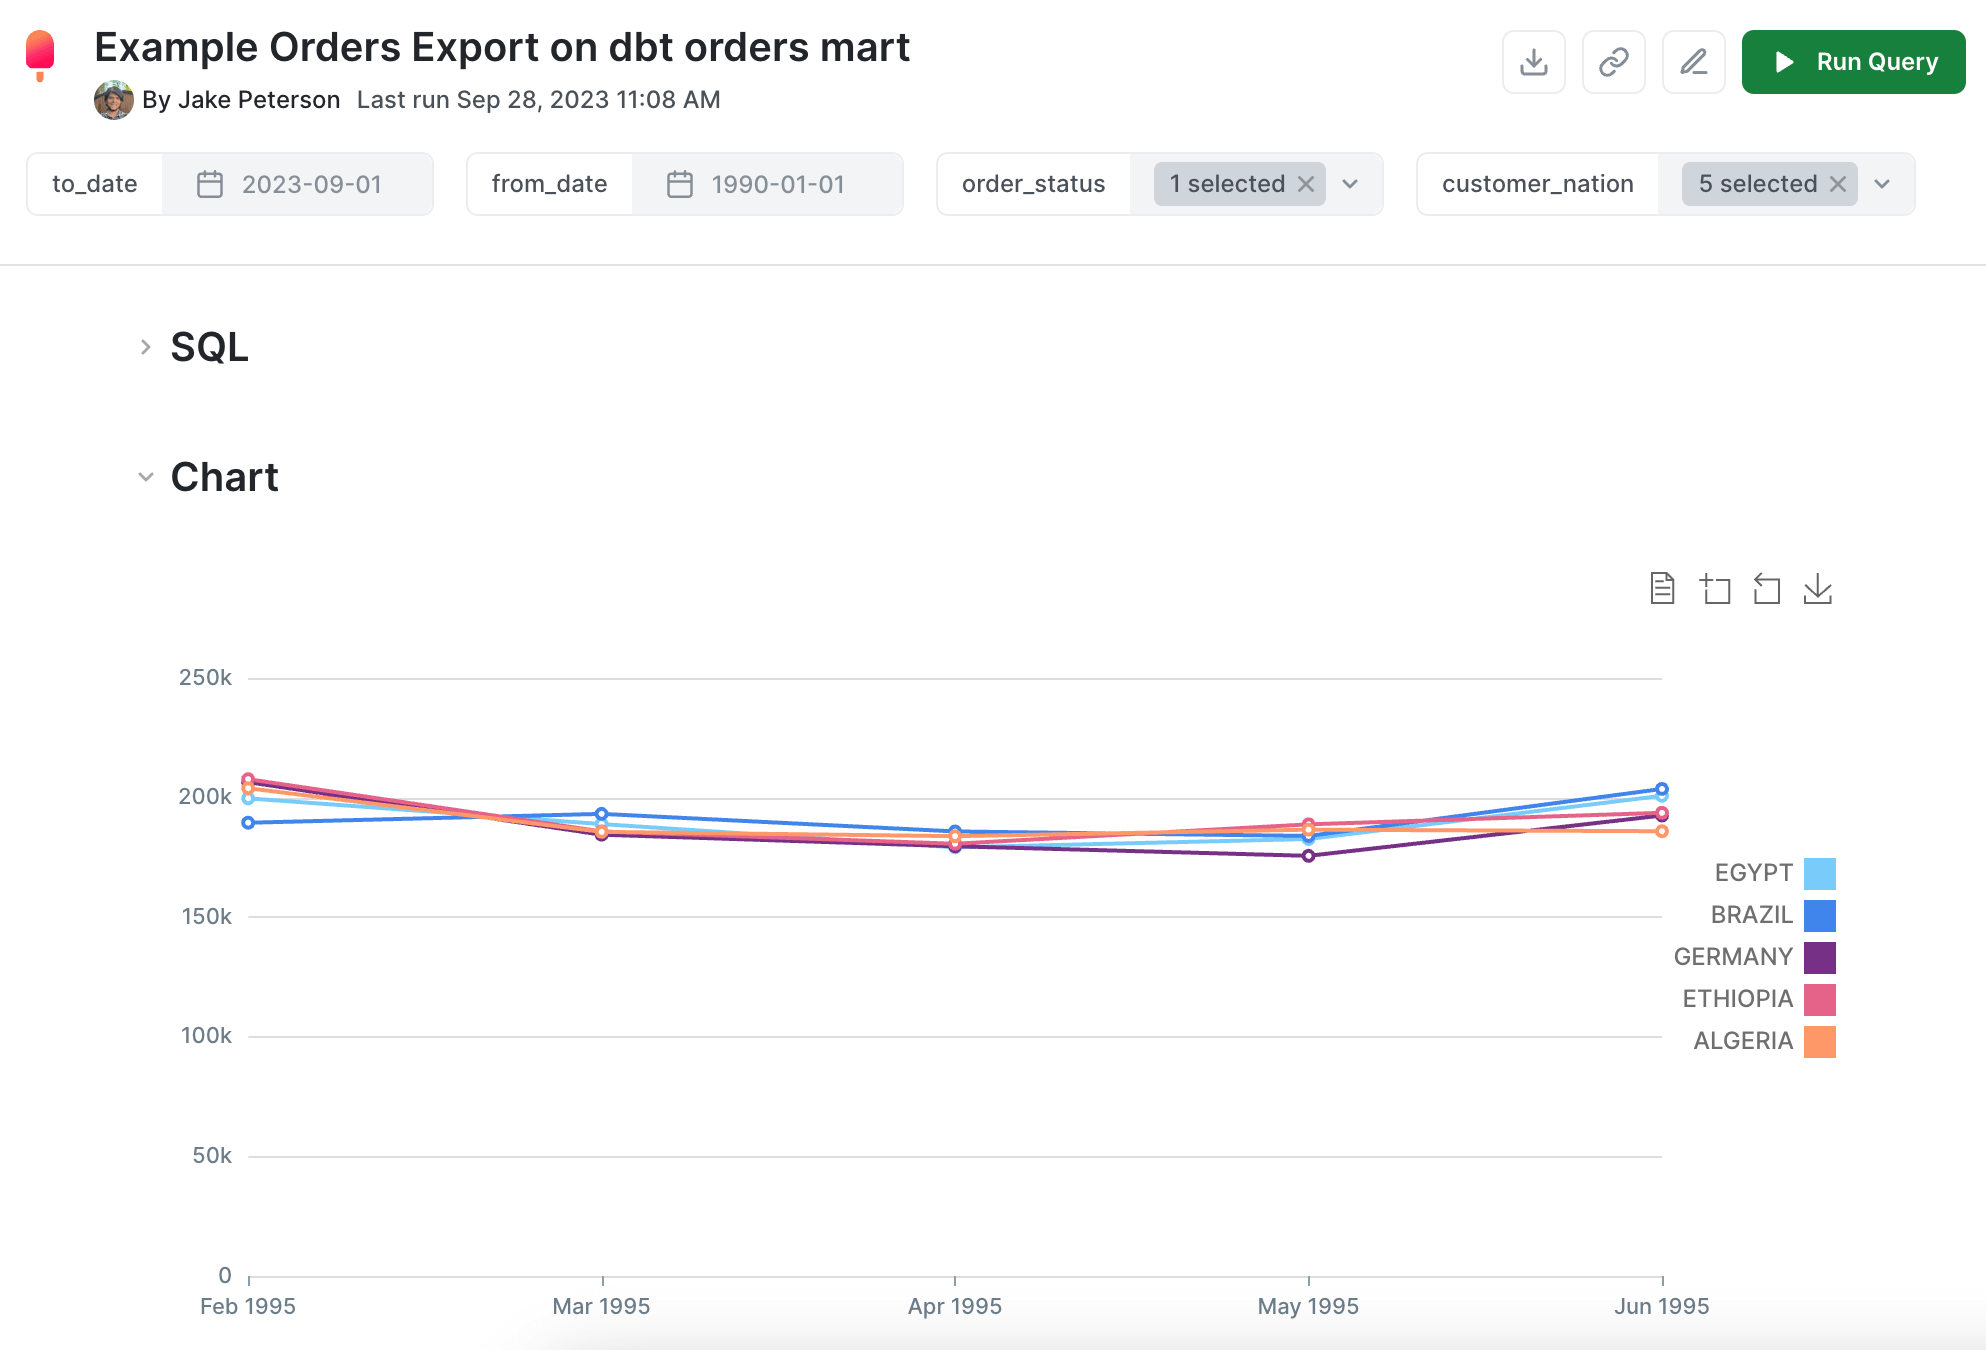
How to deploy your dbt project for Snowflake
Now that we’ve run through the basics of how to develop your dbt models, the next step is to “deploy” your project. The most basic version of “deploying” a dbt project is to schedule some dbt commands to run on a regular basis. First priority is dbt test, but soon you’ll probably start needing dbt build as well once you start materializing tables for your data marts.
Deploying a dbt project often refers to the processes of orchestrating, scheduling, and managing its runs in different environments. A well-deployed dbt project ensures timely data transformations, high reliability, and seamless integration with other components of the data stack. Here are some popular options for deploying your dbt project:
Github Actions:
- Description: A powerful CI/CD pipeline automation tool built into Github’s existing development architecture. You can schedule workflows or trigger them based on other Git actions like commits or merges.
- Advantages: Simple to set up, can be managed by less technical users (like data analysts who are new to dbt and probably new to software development and orchestration).
Dagster:
- Description: A data orchestrator that allows you to define, schedule, and monitor data workflows. Dagster has built-in support for dbt.
- Advantages: Strong focus on testing, monitoring, and local development, with a unique type system for data validation.
Custom Scripts and Cron Jobs:
- Description: For simpler deployment needs, you can use basic scripts (bash, Python, etc.) to run dbt commands. These scripts can then be scheduled using Cron (on UNIX systems) or Task Scheduler (on Windows).
- Advantages: Lightweight, no additional infrastructure required, and quick to set up for straightforward workflows.
Apache Airflow:
- Description: A platform to programmatically author, schedule, and monitor workflows. You can create custom Airflow operators or use the BashOperator to run dbt commands.
- Advantages: High configurability, extensible through plugins, supports complex dependency management, and integrates seamlessly with many other data tools. You can use a tool like Astronomer to make the process easier.
dbt Cloud:
- Description: A managed service offered by dbt Labs, the creators of dbt. It provides a web-based interface for running, scheduling, and managing dbt projects.
- Advantages: Integrated job scheduling, built-in authentication, direct support, version control integration (like Git), and a dedicated environment for development and production.
Container Orchestration Systems:
- Examples: Kubernetes or Amazon ECS.
- Description: You can containerize your dbt project using Docker and then use orchestration systems to manage its deployment, scaling, and operation.
- Advantages: Scalability, efficient resource usage, consistency across environments, and potential for seamless integration with cloud-native data stacks.
Serverless Platforms:
- Examples: AWS Lambda, Google Cloud Functions.
- Description: For event-driven dbt runs or infrequent transformations, serverless platforms can be a cost-effective and straightforward solution.
- Advantages: Pay-per-execution pricing model, no infrastructure management, and easy scalability.
Cloud-specific Workflow Tools:
- Examples: AWS Step Functions, Google Cloud Composer, Azure Data Factory.
- Description: Cloud providers offer their own workflow orchestration tools that can be integrated with dbt.
- Advantages: Native integration with other cloud services, potentially better cost management, and often provide a visual interface for workflow management.
When deciding on a deployment option, consider factors like the complexity of your workflows, the need for scalability, integration with other tools in your stack, your team's expertise, and your long-term data strategy. In many cases, a combination of tools might be used to achieve the desired outcome.
dbt and Snowflake tips and best practices
In the world of dbt and Snowflake, a few expert tips can transform the way you handle data. This section unravels key best practices, from efficient query management to the nuances of access control. Dive in to sharpen your approach and extract maximum value from your dbt and Snowflake operations.
Query Tags
Query tags in Snowflake offer a way to label or annotate your SQL queries. This is useful for several reasons:
- Organization and Identification: When multiple queries are running, or when you're looking through a history of executed queries, tags help in quickly identifying which queries originated from dbt and their specific purpose.
- Cost Allocation: Snowflake bills based on the compute resources consumed by queries. By tagging dbt-related queries, it's easier to allocate costs to specific teams, projects, or functionalities.
- Performance Monitoring: If certain tagged queries are consuming excessive resources or running longer than expected, they can be quickly identified and optimized.
Using dbt's query tags for Snowflake ensures that you have better clarity and control over the queries emanating from your dbt projects. It’s a simple yet effective way to manage and monitor your data transformations. Tags can be applied to specific models, groups of models, or pretty much any way you need them. Check out dbt’s documentation for details.
Copying Grants in Snowflake with dbt
When managing data in Snowflake, it's important to ensure the right access levels for different users and roles. Snowflake’s grants control who can see and modify specific objects. When using dbt to create or update database objects, there's a need to ensure that these grants persist or are appropriately modified.
dbt has a configuration for Snowflake called copy_grants that can be a lifesaver here. Instead of manually re-applying permissions every time a change is made, dbt can be configured to automatically "copy" the grants from the old version of an object to the new one. This not only reduces manual intervention but ensures a consistent and secure access control system throughout your dbt transformations in Snowflake.
Setting up Snowflake users and roles for dbt
One of the big advantages of Snowflake is its role-based permission system. This allows you to link ownership to a role, so each layer in the process is kept separate. Check out this article from dbt Labs for more information. The basic structure will work like this:
Snowflake Roles:
data_loaderhas owner (write) access to data source schemas so it can load raw datadbthas view access to data sources and owner (write) access to all dbt modelsanalysthas view access to all data layers so they can investigate potential data issuesdata_consumeronly has view access to data marts for powering reports and dashboards
Snowflake Users:
- Human users with access to Snowflake (username can be their names)
airbyteand additional non-human user accounts for data loading tools you usedbtto use when scheduling dbt commands so its not attached to a human user
Each user can be assigned one or multiple roles, depending on what their job entails.
Upstream model references as CTEs
If an upstream model is referenced in a model, ideally they should be referenced in a CTE at the top of the file. This ensures others can easily see the dependencies right away rather than looking through the whole file for jinja references.
CTE references like this are beneficial for Snowflake because its SQL engine knows to refer to the CTE directly as a table, so joining to the CTE isn’t much different from joining directly on the table. This behavior is not the same in some other databases like mySQL and PostgreSQL, where it will likely degrade performance, but for Snowflake it works well.
You can even use a macros, like this one in Gitlab’s dbt project, to easily list out your upstream models.
Although it’s convenient and makes your models more readable, in some cases the select * CTEs can degrade performance. If you notice cost or performance issues in any of the models that use select * CTEs, try selecting only the columns you need to see if things improve.
Empower your data teams
Now that we've covered the ins and outs of dbt and Snowflake, one thing is clear: this duo can offer a lot of added efficiency and power for data teams. Yet, the journey can often be dotted with challenges, from setup complexities to ensuring seamless collaboration among data teams.
Enter PopSQL. Our solution is tailor made for modern data teams. With PopSQL, you get a collaborative SQL editor that's perfect for diving into Snowflake queries and schema explorations, with a shared query library and advanced search that ensures your team is always on the same page. Business users too can derive insights effortlessly with our charts, dashboards, and query variables. And for those diving deep into dbt, PopSQL doubles as a simple dbt IDE, removing the need for an advanced local development environment. This opens the door to dbt development for data teams that might not be as familiar or comfortable with the command line, git, config files, etc. By consolidating these functionalities, PopSQL ensures you save time, allowing your team to channel their energies into extracting even more value from the dbt and Snowflake duo. In the world of data, efficiency and collaboration are key, and with PopSQL, you're primed to unlock both.
Check out PopSQL’s intro video or the dbt integration demo in the documentation, or sign up to try it out yourself!
FAQ
What is dbt and how does it relate to Snowflake?
dbt is an open-source software tool that enables data analysts and engineers to transform and model data in the data warehouse. When used with Snowflake, a cloud-native data platform, dbt can leverage Snowflake's capabilities to efficiently run data transformations.
How do I set up dbt with Snowflake?
Setting up dbt with Snowflake involves configuring your dbt profile with the appropriate Snowflake account details, database, warehouse, and other settings. You can find details in the article above with a step-by-step guide on the setup process.
Do I need extensive SQL knowledge to use dbt with Snowflake?
You definitely need some SQL knowledge. While dbt uses SQL for data transformations, it provides a more structured and modular approach, so each dbt model may be easier for a SQL beginner to understand. The tool also caters to those with more advanced SQL skills for complex transformations, and even leverages Jinja to power transformations that are too complex for SQL to handle alone.
How does dbt improve data transformation performance in Snowflake?
dbt doesn't inherently speed up transformations. Instead, it makes the SQL workflow more efficient and maintainable. Snowflake's architecture ensures that transformations run quickly and at scale. There are some efficiency gains possible in dbt, like setting up models to materialize incrementally (only load new data each day rather than loading the whole table every day).
Is there a cost associated with using dbt with Snowflake?
dbt Core is open-source and free to use if you’re familiar with setting up and using open-source projects. You can also use cloud hosted tools like dbt Cloud or PopSQL’s dbt integration if you’re not familiar with managing the software development process on your local computer.
How does version control work with dbt in Snowflake?
dbt integrates seamlessly with version control systems like Github, Gitlab, etc. This allows teams to track, review, and collaborate on changes, ensuring a maintainable and transparent codebase.
Can I integrate dbt with other BI tools and platforms when using Snowflake?
Absolutely! Both dbt and Snowflake offer vast integration ecosystems. You can easily connect them with SQL tools like PopSQL, modern BI tools, data orchestration platforms, and other data-centric solutions.
What security measures are in place when using dbt with Snowflake?
Snowflake provides robust security features like automatic encryption, role-based access controls, and multi-factor authentication. When using dbt, your transformation code's clarity and lineage can enhance data governance and responsible usage.
Previous
dbt snapshotNext
dbt sources